
The Model Library is one of StyTrix's most powerful features for fashion designers who want consistent, repeatable virtual models across every project. Instead of writing AI prompts from scratch each time, you build a character once — and reuse it forever.
This tutorial walks you through every feature of Model Library, with a live-generated example.
How to Open Model Library
In the left sidebar, scroll to Universal Resources and click Model Library. The panel slides in from the right and shows two tabs: Create and My Models.
The Create Tab — Building Your Character
Step 1: Choose Output Size
At the top of the panel, Output Size lets you pick from 6 aspect ratios:
| Ratio | Resolution | Best For |
|---|---|---|
| 1:1 | 1024×1024 | Profile photos, square posts |
| 2:3 | 832×1248 | Full-body, fashion editorial |
| 3:4 | 896×1152 | Portrait photography |
| 4:3 | 1152×896 | Banner ads |
| 16:9 | 1344×768 | Landscape scenes |
| 9:16 | 768×1344 | Mobile / Reels |
The pixel dimensions update instantly as you click.
Step 2: Reference Image (Optional)
The Reference Image zone accepts:
- Drag & drop from your computer or from the StyTrix Canvas
- Click to browse local files
- Drag a previously generated canvas image directly in
The reference image is compressed and stored with the model, so when you load a saved model later, the reference photo is fully restored.
Step 3: Basic Attributes
Expand Basic Attributes (open by default) to set:
- Character Type — Human / Anime / 3D Stylized / Fantasy
- Gender — Male / Female / Non-binary
- Ethnicity — Caucasian, Asian, African, Latino, Middle Eastern, South Asian, Mixed
- Skin Tone — 6 levels from Very Light to Very Dark, with color swatch previews
- Eye Color — Blue, Green, Brown, Hazel, Gray, Amber (with color dots)
- Age — Child (5-12) through Elderly (60+)
- Skin Features (multi-select) — Freckles, Moles, Scars, Wrinkles, Birthmarks
Pro tip: Hover over any option chip to see a thumbnail preview of that attribute before committing.
The badge number on each section header shows how many attributes are currently selected.
Step 4: Face Details
Expand Face Details to control individual facial features:
- Face Shape — Oval, Round, Square, Heart, Oblong, Diamond
- Eye Shape — Almond, Round, Hooded, Monolid, Upturned, Downturned
- Eye Details (multi-select) — Long Lashes, Thick/Thin/Arched/Bushy Eyebrows, Double Eyelid
- Nose — Straight, Button, Roman, Upturned, Aquiline, Wide
- Mouth — Full Lips, Thin Lips, Wide Mouth, Small Mouth, Cupid's Bow
- Ears — Small, Average, Large, Pointed
Step 5: Body & Style
Expand Body to set physique:
- Body Type — Slim, Athletic, Average, Muscular, Curvy, Heavy
- Height — Very Short through Very Tall
Expand Style for hair and clothing:
- Hair Style — Short, Medium, Long, Curly, Wavy, Straight, Bald, Buzz Cut
- Hair Color — Black, Brown, Blonde, Red, Gray, White, Auburn (with color swatches)
- Clothing — Casual, Formal, Sporty, Fantasy, Sci-Fi, Medieval
Generated Prompt — No Writing Required
As you make selections, the Generated Prompt preview at the bottom of the panel updates in real time. For example:
human character, female, Young Adult, caucasian, light skin, brown eyes
This prompt is automatically sent to the AI — you never need to write it yourself. You can also add Additional Details (free-text) for scene context, pose, or mood.
Live Example: Generated Model
Here's a model generated with these settings:
| Attribute | Value |
|---|---|
| Character Type | Human |
| Gender | Female |
| Ethnicity | Caucasian |
| Skin Tone | Light |
| Eye Color | Brown |
| Age | Young Adult (20-30) |
| Output Size | 2:3 (832×1248 px) |
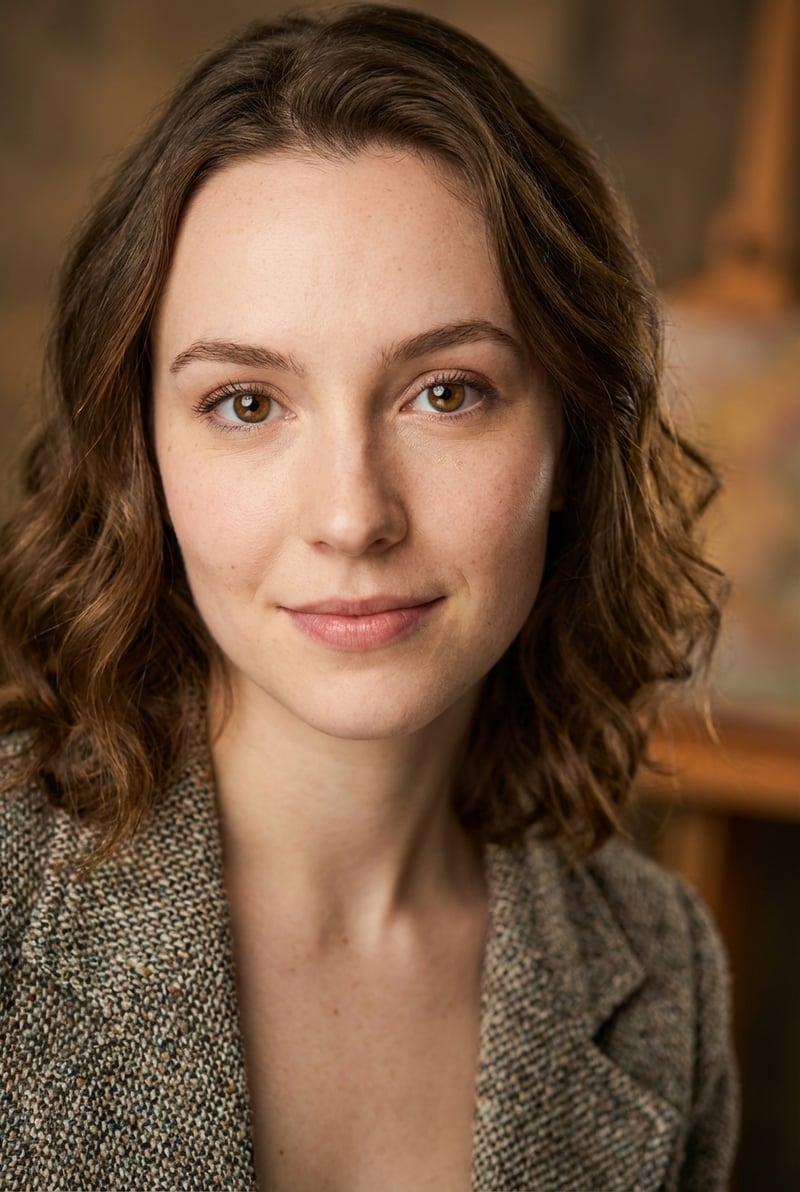
The result: natural light skin, warm brown eyes, wavy brown hair, light makeup, and a casual blazer. The quality matches professional portrait photography.
The My Models Tab — Manage Saved Characters
Switch to My Models to see all saved characters in a 2-column grid. Each card shows:
- The character's portrait thumbnail
- A label summarizing the key attributes (e.g. human female asian)
- A trash icon to delete the model
Click any card to instantly load all settings — including the reference image — back into the Create tab. This is the core workflow benefit: build once, reuse everywhere.
How to Save a Model
After generating an image you're happy with, the system prompts you to save this configuration to My Models. The saved model captures every attribute selection plus the reference photo, so future sessions start exactly where you left off.
Real-World Use Cases
Consistent Brand Model Build one character with a specific ethnicity, hair color, and body type, save it, and use it across every product photoshoot. Eliminates prompt drift between sessions.
Group Shoot Pair Model Library with the Group Shoot tool to combine multiple saved characters in a single scene image.
A/B Style Testing Create two versions of the same character — one Casual, one Formal — and compare how different clothing styles affect the same model's appearance.
Summary
| Feature | What It Does |
|---|---|
| Create tab | Build characters visually, auto-generates prompt |
| Hover preview | See attribute effects before selecting |
| Reference Image | Use a photo as generation reference |
| Generated Prompt | All selections compiled to AI-ready text |
| My Models | Save and one-click restore any character |
| Cross-tool | Works with Group Shoot and other tools |
Model Library turns virtual model creation from a guessing game into a repeatable, professional workflow.
Frequently Asked Questions
What is StyTrix Model Library?
Model Library stores consistent AI model personas for your brand. Create diverse model profiles and reuse them across all product photos — ensuring consistent brand imagery without hiring real models.
Related Articles
Ready to transform your fashion workflow? See plans & get started →
Turn Your Fashion Ideas Into Reality
Generate stunning fashion designs with AI. No design skills required.
Start Creating

